Need help? Call us at 02-026-3147

prices starting from 227.36 THB

View Products

prices starting from 250 THB

View Products
Promotional Products & Giveaways!

Available with custom print in up to four colors.

View Products
  • corporate customers
  • help
  • about us
  • work with us
  • blog

How to reach us

02-026-3147

social media

Print n

Please follow our artwork preparation guidelines to ensure that your artwork file is set up correctly.

  • 1. Add 1 cm of bleed

    During the production of large format products, cutting imperfections are to be expected - cutting can be off by multiple millimeters from the cutting line. To allow leeway for such imperfections, you should add 1 cm of bleed on all edges of your artwork. Make sure that all colors, background pictures, and elements extend to the edge of the bleed area, to avoid the appearance of white borders on certain edges after cutting.

  • 2. Keep your content within a 2.5 cm safety margin

    To ensure that no important elements (text, graphics, images) get cut off from your large format product, make sure to keep such elements at least 2.5 cm away from the edge of your finished product dimensions.

  • 3. Use CMYK color mode

    Except for silkscreen and pad printing, files should be prepared in CMYK color mode. Keep in mind that if the setup is wrong, colors on the finished product may differ from the file you sent. Here is how to set your artwork to CMYK color mode in Adobe Illustrator.

  • 4. Use an image resolution of at least 300 DPI

    To avoid blurriness, use only images and graphics that have a resolution of 300 DPI or more. Before sending your files, make sure to embed your images into the file. Read more about how to check the resolution of your assets.

  • 5. Use the right values for gray elements

    When setting up grey elements, set K to a percentage between 0 and 100, and keep all other colors (C, M, and Y) equal to 0%.

  • 6. Use the right values for black elements

    When setting up black text, thin lines and small elements, use pure black, i.e. C = 0, M = 0, Y = 0, K = 100). Text, thin lines, and small elements in pure black color should be set to overprint to avoid white gaps around the text. For larger elements, use a composite form of black (we recommend C = 30, M = 0, Y = 0, K = 100).

  • 7. Use maximum 2 colors for lines that are finer than 2 pt

    If lines are 2 pt thick or less, use only 1 or 2 colors. 4 colors may be used for thicker lines.

  • 8. Convert all fonts to outlines, or embed them in your file

    To avoid issues with fonts when submitting your file(s), make sure to convert fonts to outlines, or to embed all fonts when saving to PDF.

  • 9. Save and upload your artwork files as PDF/X-1a

    The best format for submitting print-ready files is PDF, under the PDF/X-1a standard. Where possible, submit your files in PDF format. See why PDF/X-1a is the right format for printing.

  • 10. Check for overprint

    Make sure that no elements are set on overprint, unless you need them to be.

Our free templates provide you with all the information you need to correctly prepare your artwork files for printing. Simply download the template that matches your desired product configuration.

If you have any questions about the product and ordering process, please have a look at our Frequently Asked Questions (FAQ). If can't find your question in our FAQ section, you can reach our friendly customer support on 02-026-3147.

  • 1. What is the fastest delivery for n?

    The fastest delivery time for n is d. Please note that you have to submit your order before 01:00 PM. Late payment or upload of your artwork might further delay your order. If you select Digital Proof Print during the checkout process, the production will only begin after your approval.

  • 2. How will my n be delivered?

    All of our products are delivered in a securely packed cardboard box.

  • 3. Which formats can I upload?

    The best format for submitting print-ready files is PDF, under the PDF/X-1a standard. Learn how to save your artwork using PDF/X-1a standard in Adobe Illustrator. However you can also upload your file in JPEG, PNG, PSD, EPS, TIFF or AI format for an additional fee of THB 50.00. Our graphic designers will then convert your file into a print-ready PDF file.

1. Choose Your Options

    • * Width must be between cm and cm
    • * Height must be between cm and cm
    • * Your number of pages is not available.

Format

Print Both Sides

Front & Back

Print CMYK on two sides

Material type

Finishing

Stand Options

Artwork Option

Can't Find What You Are Looking For? Click here

Details about ordering J-Flags:

  • Please note that our prices are already inclusive of the stand for your products
  • We accept one design per order item and multiple designs per order item with the same artwork closing process.
  • To prepare and close your artwork files, please follow our specific guidelines for J-Flags, which you can find here
  • Looking for design service do look:

    here!

J-Flags

Upload Design

Change to other services
  • ProductJ-Flags
  • Format50 x 180 cm
  • PagesFront & Back
  • ColorsFront & Back
  • Material typeVinyl Outdoor 1440dpi
  • Artwork OptionSingle Design
  • FinishingPole Pockets
  • Quantity
  • Delivery date

        Found a Lower Price?

        We'll issue a voucher for 120% of the difference ! Learn More

        Request Paper Sample

        Request our sample box for free ! Learn More

        J-Flags Product Details

        Print J-Flags Online

        Print J-Flags with Gogoprint to:

        • Advertise your business at outdoor events
        • Advertise your service and/or promotions right outside your door
        • Attract passers-by to your store and/or stand
        • Vinyl Outdoor 1440dpi:

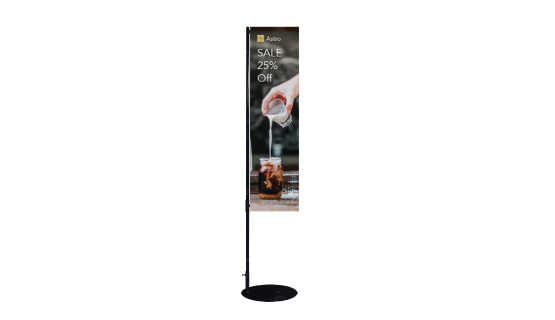
          Our high quality vinyl ensures that the banners for your J-Flags are beautifully printed, and as durable as possible for extensive use outdoors (or indoors), and protection against the elements. 1440dpi ensures that you enjoy the highest available resolution for your banner. Perfect if you are using detailed graphical elements in your J-Flag’s design. A J-Flag stand is available as an extra for your order.

        • Pole Pockets:

          All J-Flag banners as standard are finished with pole pockets that enable you to attach the flags on a pole. The pole pockets are strong and durable, to ensure that your flag banner remains solidly fixed to the pole in case of strong wind.

        Why You Should Print J-Flags for Your Business?

        Like advertising banners, J-Flags are very powerful tools for outdoor advertising/marketing. They are a great way for businesses to attract the attention of passers-by and potential customers in any location and at any event. The advantage of printing J-Flags is that they can be ordered with their own stand, which means that they are 100% mobile. Then again, banners have the advantage of covering a greater surface, which is great for visibility.

        Nevertheless, J-Flags are the perfect mobile outdoor advertising medium. Indeed, they are extremely easy to store, transport, and set up, they can be placed absolutely anywhere, and are durable enough to be used on many occasions spread over several years. Indeed, J-Flags are easy to maintain and clean thanks to the use of vinyl, and they are UV-resistant and absolutely weatherproof. In addition, all J-Flag banners come with pole pockets as standard, so that you can install them on your pole if you already have one. If you do not yet have one, you can order it together with your order as an extra.

        If you’re a business, you are going to want to print J-Flags for a variety of occasions: when you attend large or small outdoor events, or if you want to catch people’s attention in the street. Printed J-Flags can remain outside by any weather, and therefore attract the attention of a large amount of people. To maximize the impact of your J-Flags, you need to design them bearing in mind the objectives of posters. For a reminder on the best practices of poster design, have a read through this blog post and its recommendations. It is crucial that you use a fonts, font-colors, and font-sizes that make text legible from far away, while graphics used should also appear clearly from a distance. Businesses that print J-Flags and use them regularly, find that it is a smart investment that quickly pays off.

        With Gogoprint, printing J-Flags is as easy and convenient as anything can be, all at a low cost. As with all other products, you order the products online, upload your files, and wait for the products to be delivered for free anywhere in Thailand.


        J-Flags Review & Rating

        
        1 reviews
        5.00 / 5 stars
        LINE Bear

        Not Sure How to Order? Add us on LINE

        Click here to add us on Line
        Scan our QR code to get started

        Our team will help you select the right product and get your order delivered in no time.

        You can also call us

        02-026-3147

        Guides and Tools

        Everything you need to know to get your Artwork ready

        Please follow our artwork preparation guidelines to ensure that your artwork file is set up correctly.

        • 1. Add 1 cm of bleed

          During the production of large format products, cutting imperfections are to be expected - cutting can be off by multiple millimeters from the cutting line. To allow leeway for such imperfections, you should add 1 cm of bleed on all edges of your artwork. Make sure that all colors, background pictures, and elements extend to the edge of the bleed area, to avoid the appearance of white borders on certain edges after cutting.

        • 2. Keep your content within a 2.5 cm safety margin

          To ensure that no important elements (text, graphics, images) get cut off from your large format product, make sure to keep such elements at least 2.5 cm away from the edge of your finished product dimensions.

        • 3. Use CMYK color mode

          Except for silkscreen and pad printing, files should be prepared in CMYK color mode. Keep in mind that if the setup is wrong, colors on the finished product may differ from the file you sent. Here is how to set your artwork to CMYK color mode in Adobe Illustrator.

        • 4. Use an image resolution of at least 300 DPI

          To avoid blurriness, use only images and graphics that have a resolution of 300 DPI or more. Before sending your files, make sure to embed your images into the file. Read more about how to check the resolution of your assets.

        • 5. Use the right values for gray elements

          When setting up grey elements, set K to a percentage between 0 and 100, and keep all other colors (C, M, and Y) equal to 0%.

        • 6. Use the right values for black elements

          When setting up black text, thin lines and small elements, use pure black, i.e. C = 0, M = 0, Y = 0, K = 100). Text, thin lines, and small elements in pure black color should be set to overprint to avoid white gaps around the text. For larger elements, use a composite form of black (we recommend C = 30, M = 0, Y = 0, K = 100).

        • 7. Use maximum 2 colors for lines that are finer than 2 pt

          If lines are 2 pt thick or less, use only 1 or 2 colors. 4 colors may be used for thicker lines.

        • 8. Convert all fonts to outlines, or embed them in your file

          To avoid issues with fonts when submitting your file(s), make sure to convert fonts to outlines, or to embed all fonts when saving to PDF.

        • 9. Save and upload your artwork files as PDF/X-1a

          The best format for submitting print-ready files is PDF, under the PDF/X-1a standard. Where possible, submit your files in PDF format. See why PDF/X-1a is the right format for printing.

        • 10. Check for overprint

          Make sure that no elements are set on overprint, unless you need them to be.

        Our free templates provide you with all the information you need to correctly prepare your artwork files for printing. Simply download the template that matches your desired product configuration.

        If you have any questions about the product and ordering process, please have a look at our Frequently Asked Questions (FAQ). If can't find your question in our FAQ section, you can reach our friendly customer support on 02-026-3147.

        • 1. What is the fastest delivery for n?

          The fastest delivery time for n is d. Please note that you have to submit your order before 01:00 PM. Late payment or upload of your artwork might further delay your order. If you select Digital Proof Print during the checkout process, the production will only begin after your approval.

        • 2. How will my n be delivered?

          All of our products are delivered in a securely packed cardboard box.

        • 3. Which formats can I upload?

          The best format for submitting print-ready files is PDF, under the PDF/X-1a standard. Learn how to save your artwork using PDF/X-1a standard in Adobe Illustrator. However you can also upload your file in JPEG, PNG, PSD, EPS, TIFF or AI format for an additional fee of THB 50.00. Our graphic designers will then convert your file into a print-ready PDF file.